


This article walks you through all the required steps to install your new Yale Assure SL Key Free Touchscreen deadbolt to your door. This guide will help you:
- Remove Existing Door Hardware
- Double Check Door Measurements
- Install your Assure Lock SL
- Program your Assure Lock SL
- Add your Assure Lock SL to your smart home system or Yale Access App*
Before You Get Started
Remove the existing hardware: Remove the current lock and strike plate if there is one already installed on the door. PLEASE NOTE: A different screwdriver may be necessary to remove the existing hardware.
Double check door measurements: Use the included door checker from the installation envelope to measure your door to verify that it meets the following:
- Cross bore holes must be 2 ⅛” in diameter
- Edge bore holes must be 1” in diameter
- Backset should be 2 ⅜” or 2 ¾”
PLEASE NOTE: If the existing lock holes on your door do not meet the specs, you will need to drill the holes again after removing your existing lock or work with an Installation Pro to ensure right-sizing.
Keep the existing lock until installation and testing are complete.
What You Need
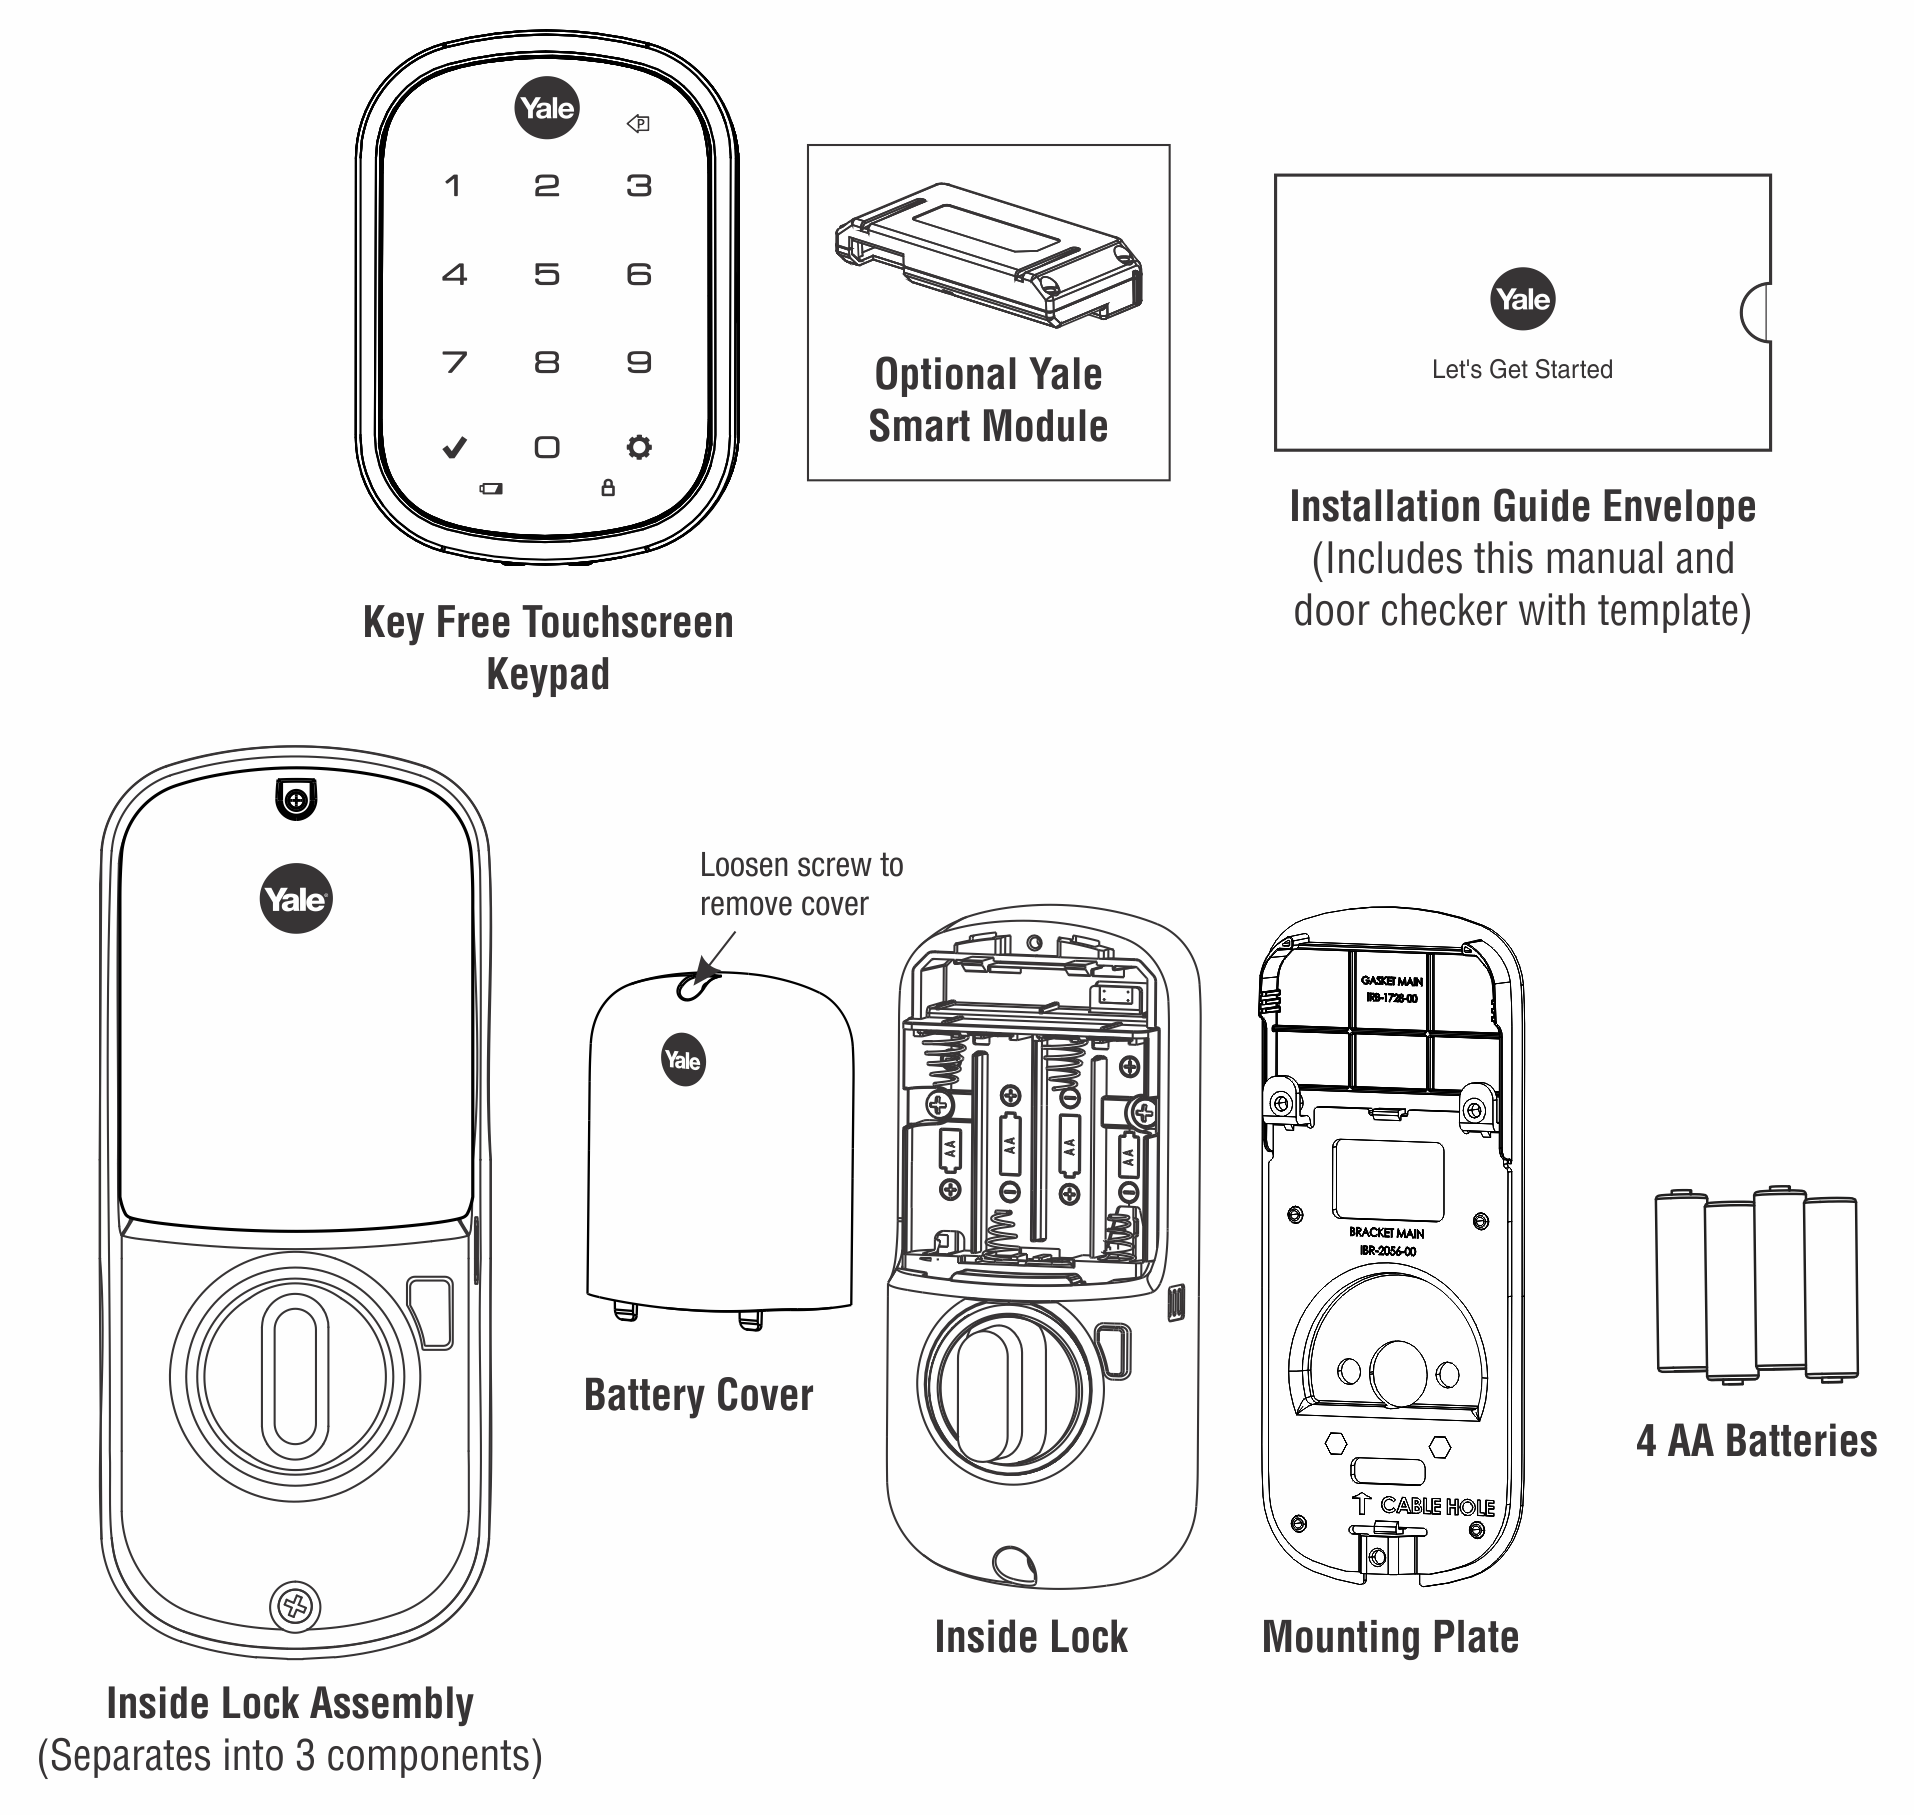
The following is a list of everything you need to begin installing this lock. Verify that all of these parts were included in the packaging:
- Installation Guide Envelope
- Key Free Touchscreen Keypad
- Inside Lock Assembly:
- Battery Cover
- Inside Lock
- Mounting Plate
- 4 AA Batteries
- Smart Module*
*Optional
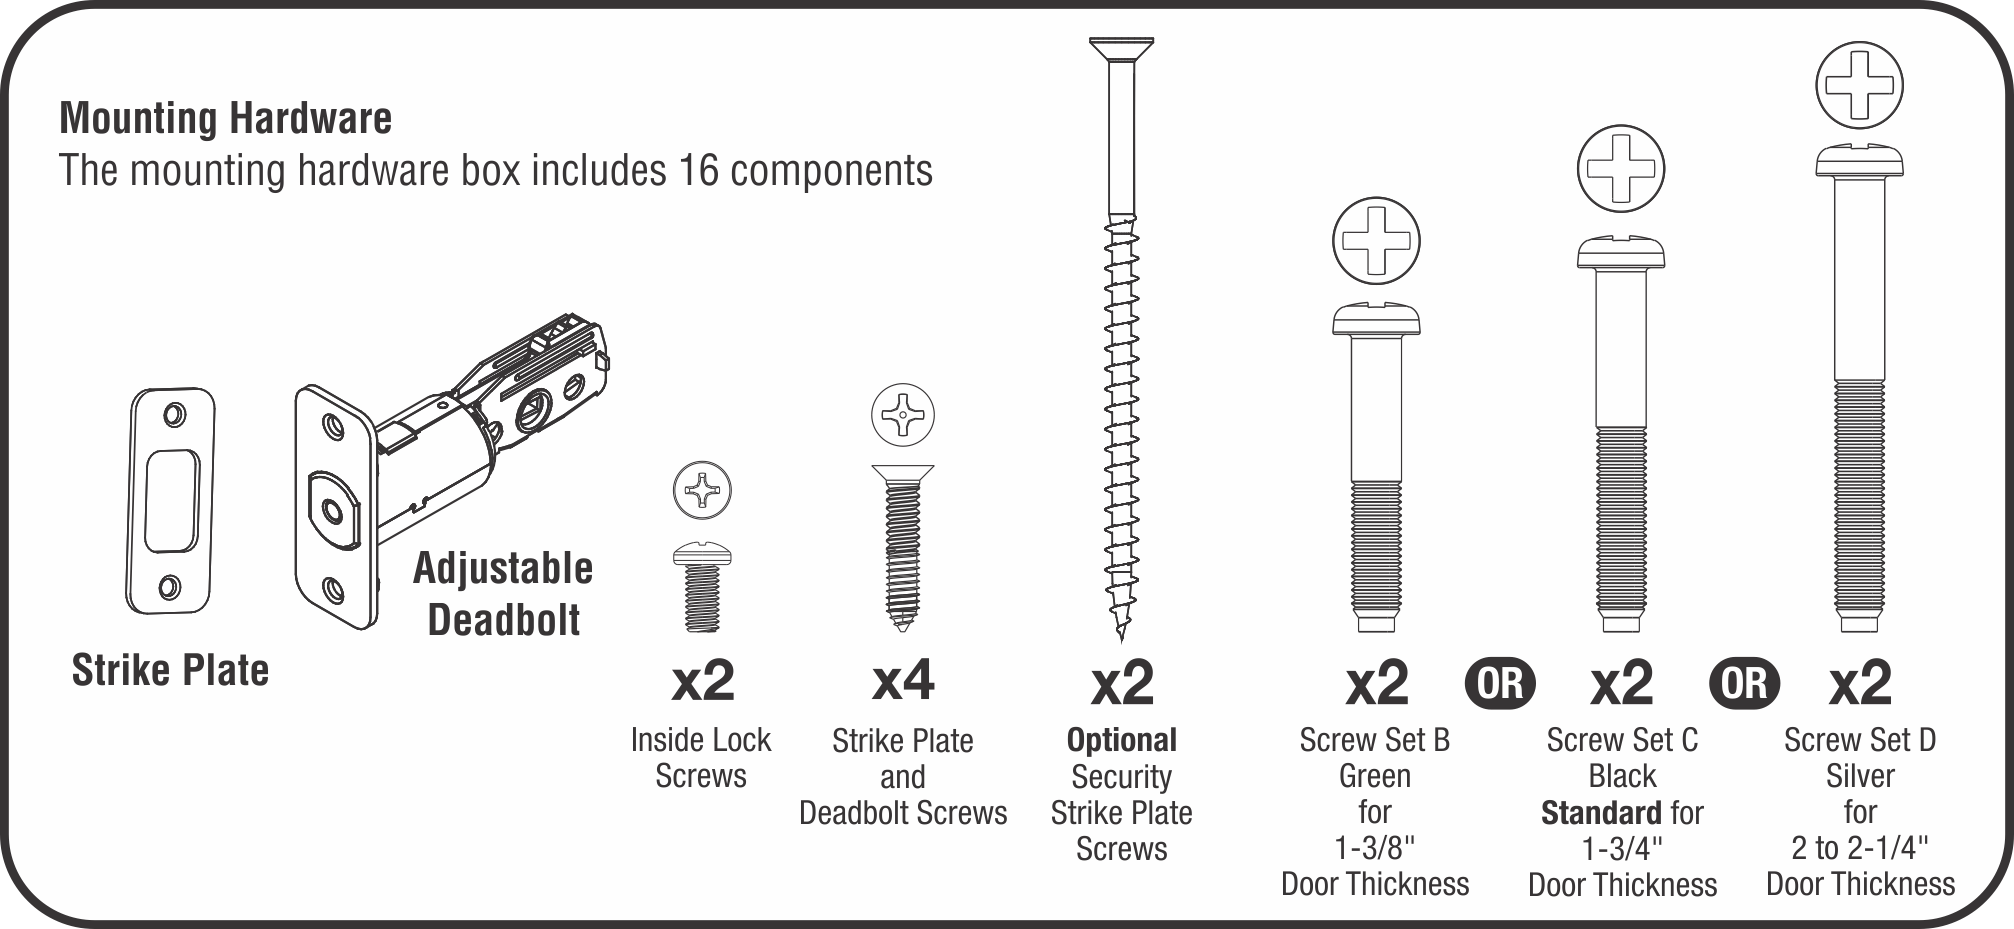
Mounting Hardware (16 Components):
- Strike Plate
- Adjustable Deadbolt
- 2x Inside Lock Screws
- 4x Strike Plate and Deadbolt Screws
- 2x Security Strike Plate Screws*
- 2x Screw Set B Green for 1-⅜" Door Thickness
- 2x Screw Set C Black Standard for 1-¾" Door Thickness
- 2x Screw Set D Silver for 2” to 2 ¼” Door Thickness
What You’ll Need to Provide:
- Standard Phillips Head Screwdriver
Installation Steps
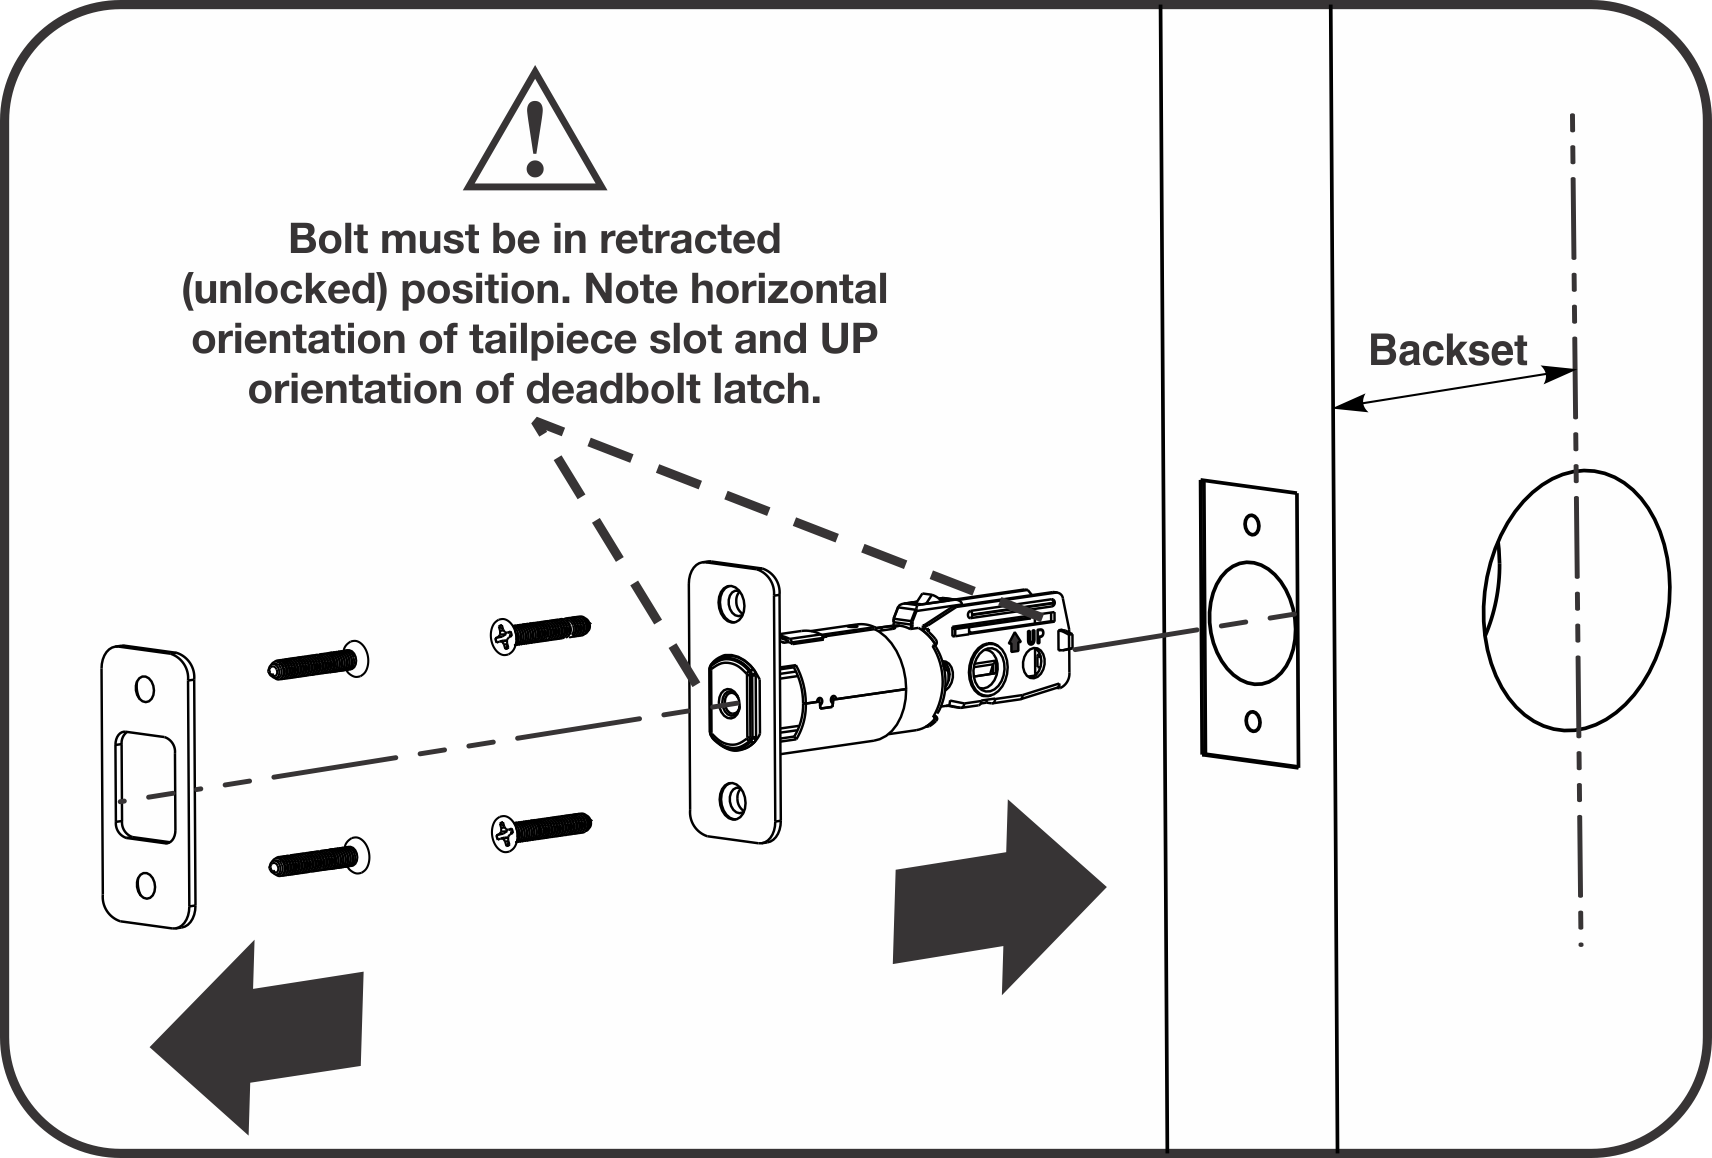
Step 1. Install the Strike Plate and Latch:
- Install the strike plate into the doorframe and secure with 2” screws.
- The latch is set to 2 ⅜”.
- Install the latch into the door in the retracted and unlocked position. Adjust the latch to 2 ¾” if you require a longer length for installation. Ensure the latch is installed with the up arrow facing upwards and secure it into place with the 2 latch screws provided. Note the horizontal orientation of the tail piece slot and UP orientation of the deadbolt latch.
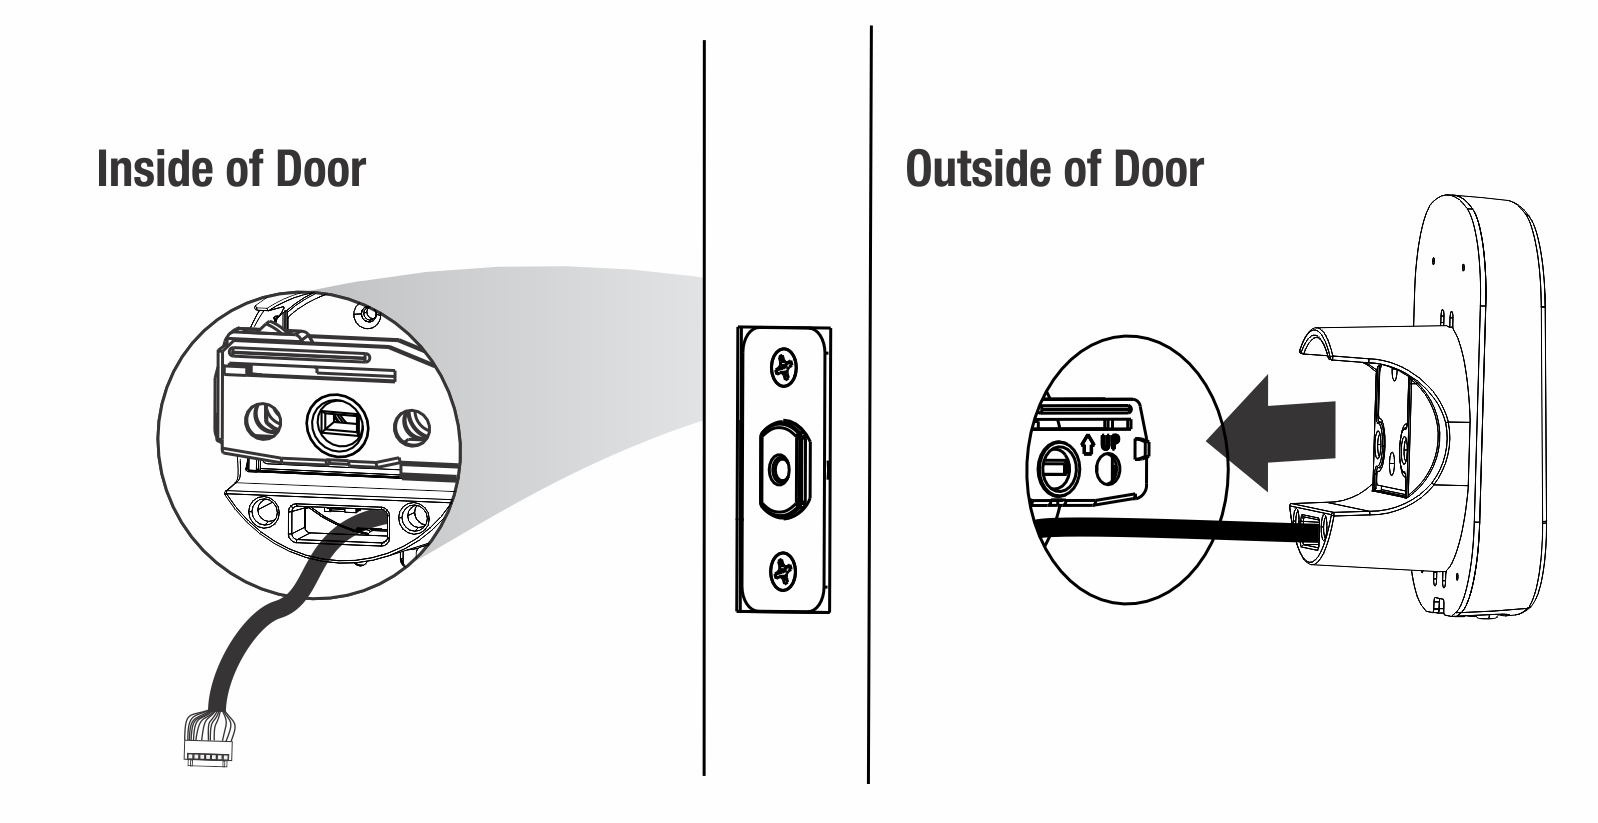
Step 2. Install the Touchscreen Keypad
- Install the exterior keypad lock so it is flush with the door. Ensure that the wires are placed under the latch.
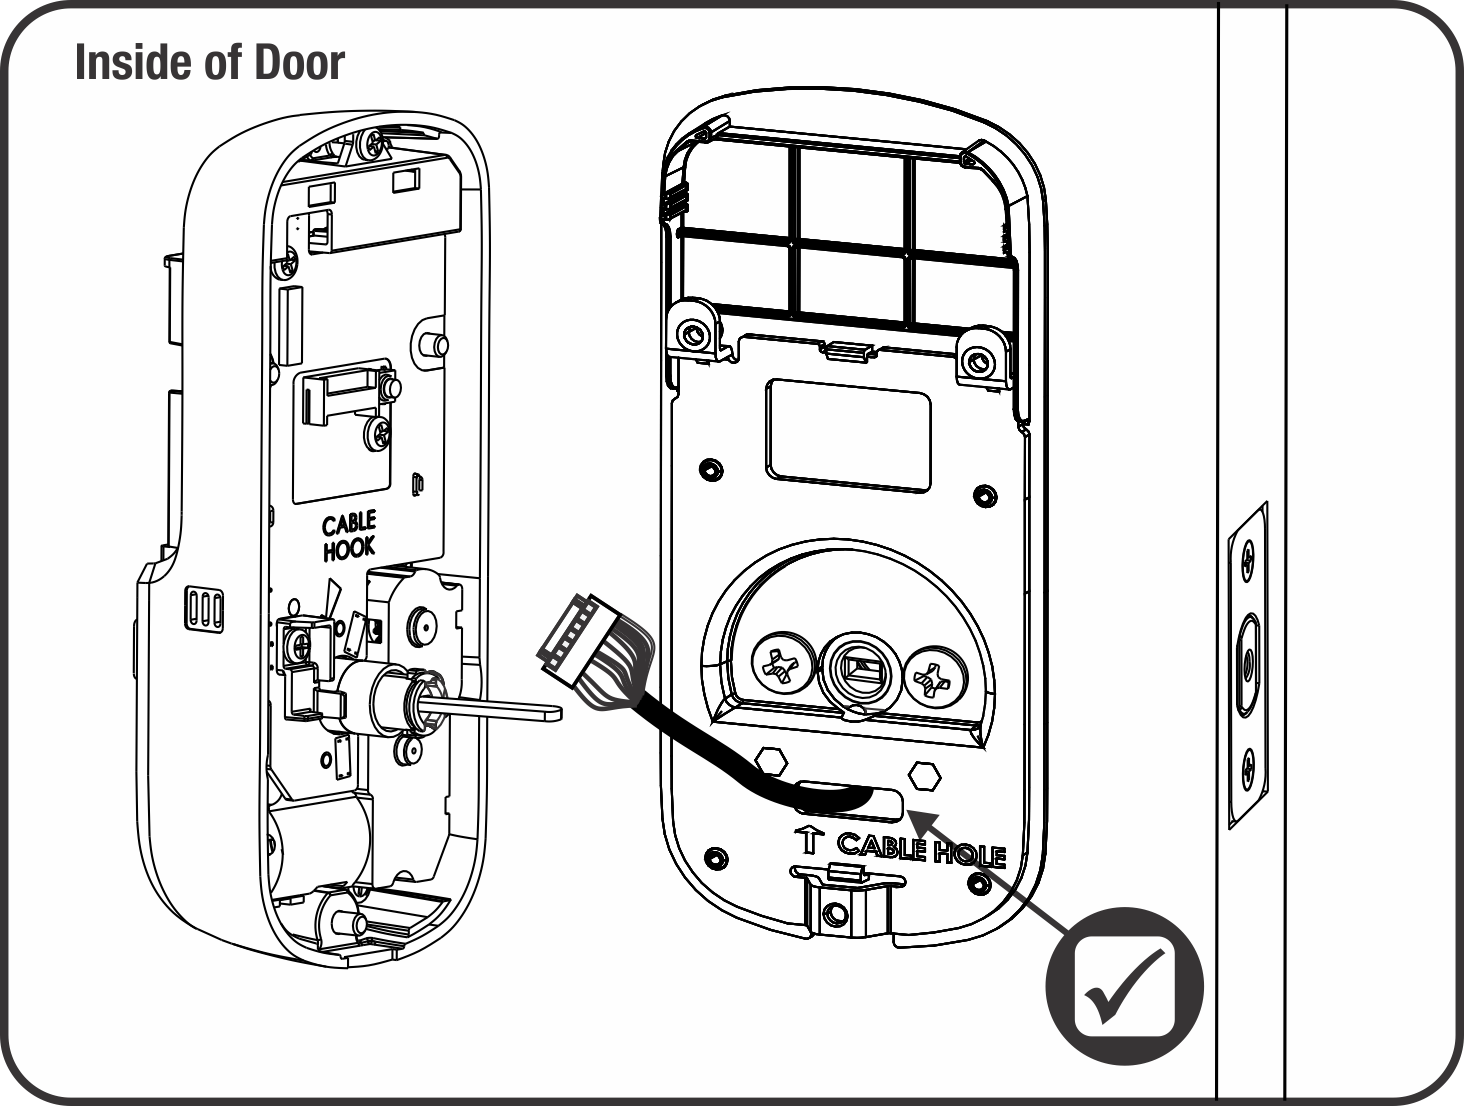
Step 3. Install the Mounting Plate
- Remove the battery cover and the interior mounting plate from the inside piece of the lock.
- Guide the cable assembly through the cable hole in the interior mounting plate. Make sure it is flush with the door and straight before attaching with the two through bolts.
- Choose the through bolt appropriate for your door thickness. Verify appropriate through bolt with the door checker included in the installation guide envelope.
Step 4. Attach the Cable Assembly
- Connect the cable to the white connector ensuring that the two white ridges on the cable are facing towards you. Guide the cable so that it fits under the hook.
Step 5. Install the Inside Lock
- Install the inside piece of the lock, ensuring that the tail piece passes into the thumbturn shaft assembly.
- Insert two mounting screws into the battery housing and one into the bottom of the inside piece of the lock.
Step 6. Test the Mechanical Operation of the Lock
- Test that the lock is functioning properly by turning the interior thumbturn several times.
- If the thumbturn operation fails, check the installation steps beginning with latch and strike plate installation.
Step 7. Install the Smart Module*
- Install the module above the battery compartment on the interior side of the lock.
- Batteries must not be installed prior to inserting and/or removing the Smart Module.
*Optional
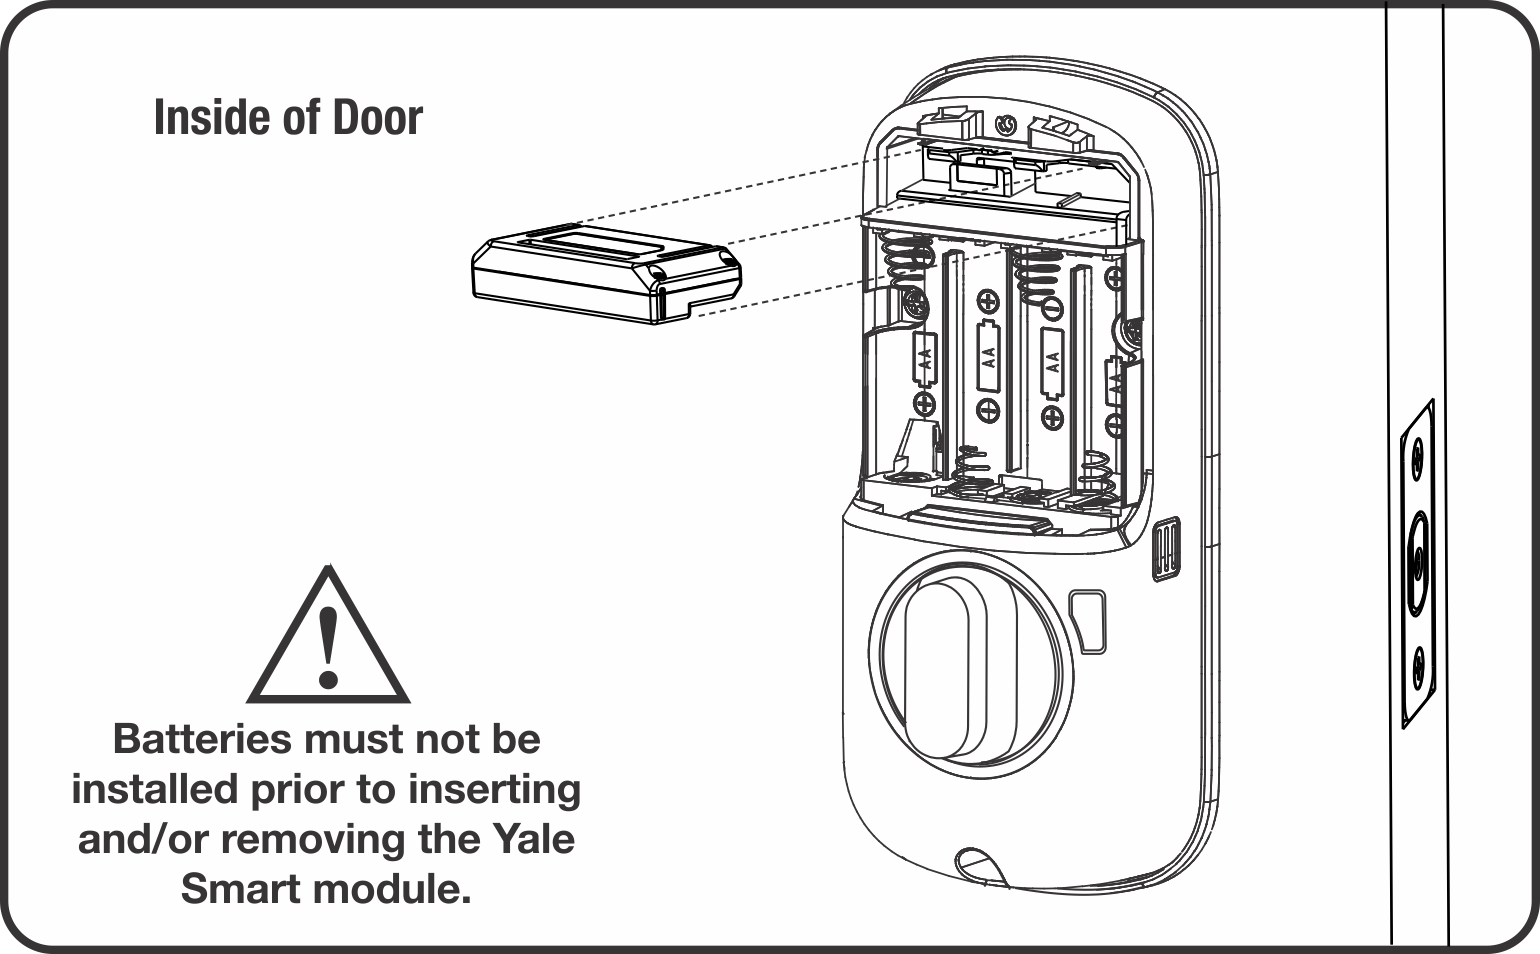
Step 8. Insert Batteries and Battery Cover
- Insert 4 AA batteries. Ensure the deadbolt is in the retracted (unlocked) position before installing the batteries.
- Reinstall the battery cover and tighten the attached screw.
Using the Lock
Follow the steps below to set up the lock and keypad:
Step 1. Program the Lock
A master entry code is used to change the lock settings. A security best practice is to set your master entry code with 6 or more digits. To set the master entry code:
- Tap the lock with 3 fingers to wake it up.
- To create a 4-8 digit master entry code, first press the gear key.
- Enter your 4-8 digit master entry code, then press the gear key.
- Your master PIN code has now been created. It is important to remember the master entry code in the event that you need to reprogram the lock in the future.

Step 2. Handing the Lock
The handing of a door is determined by facing the exterior of a door:
- If the hinge is on the left side of the door, the door is left handed.
- If the hinge is on the right side of the door the door is right handed.
Handing a lock involves setting the direction that the lock throws the deadbolt. Yale Assure Locks are designed to fit both right-handed and left-handed doors and will electronically set the correct handing during the initial set-up process. To hand the Assure Lock SL Key Free Touchscreen Deadbolt:
- Ensure the door is unlocked.
- Touch the keypad with 3 fingers.
- The latch will extend and now your lock has been handed.
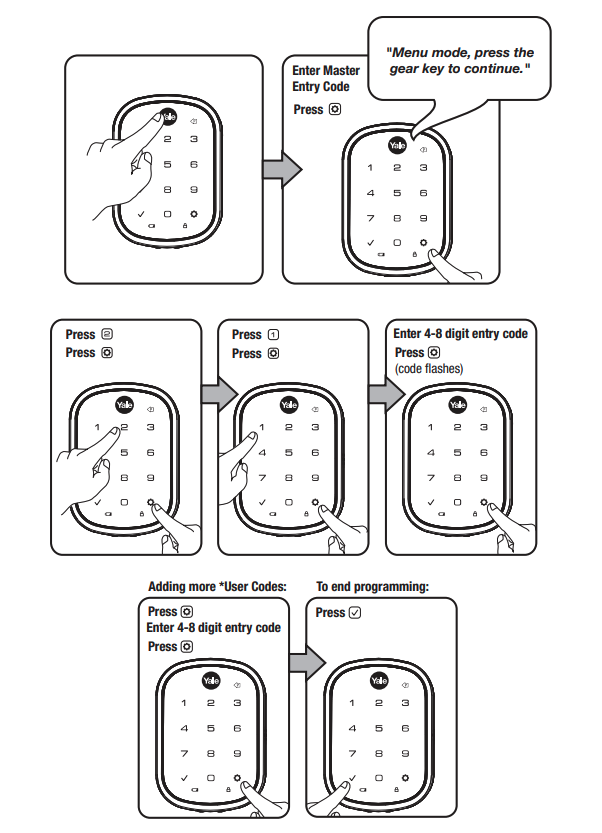
Create Entry Codes
- First, enter the master entry code and press the gear key.
- Press 2, then press the gear key.
- Press 1, then press the gear key.
- Enter a 4-8 digit user entry code, then press the gear key.
- The user entry code has now been created.
- To unlock the door, enter the master or user entry code followed by the check mark.
A master entry code must be created before creating any other entry codes.
We recommend a separate user entry code for everyday use instead of using your master entry code to unlock your door.